
Product updates
50skills Product News

Choose which days your reminders go out

Shared by Georg
• June 26, 2026
You can now pick exactly which weekdays form reminders are allowed to send. Choose any combination, weekdays only, never on weekends, or your own set, and any reminder that would land on a day you've switched off automatically moves to the next allowed day.

Great use cases
- Don't nudge a new hire about their onboarding form on a Saturday, a reminder due over the weekend waits until Monday.
- Match your team's working week, send only Sunday–>Thursday for regions where that's the work week.
- Keep reminders to set days like Mon/Wed/Fri, so people aren't chased every single day.
Important to know!
- Find it under Reminder days in the Send form action's reminder settings. 🗓️
- A reminder due on a day you've switched off automatically shifts to your next allowed day (in the journey's timezone).
- At least one day has to stay selected, and editing the days reschedules reminders that are already in flight.
- Restrict form reminders to the weekdays you choose
- Reminders that land on a skipped day move to the next allowed day

Format dates exactly how you need them
Shared by Georg
• June 26, 2026
You can now apply a date format anywhere you map a date in your actions and create your own formats to reuse across journeys. So a date can read one way in a contract and a completely different way when it's sent to another system, all from the same value.
When working with date fields, on the blue pills, you can now see a configuration section.

If you click on them you can select what date format will be used for this field when the action runs in the workflow.

Select between standardized date formats or create your own using our date format builder. 🧠

Great use cases
- Drop a date into an employment contract exactly how it should read — e.g. "28 May 2026" or "May 28, 2026" — instead of a raw timestamp.
- Send dates to a third-party system in the precise format its API expects (e.g. 2026-05-28), so integrations don't reject them.
- Save the formats your team uses most and reuse them everywhere, so dates look consistent across every journey.
Important to know!
- Apply a format to any mapped date variable in your actions. 🗓️
- Choose from built-in formats, or create your own custom presets.
- Custom presets are shared across your workspace, and managed by admins.
- Apply a date format to any mapped date in your actions
- Pick a built-in format or create your own custom one
- Saved presets are reusable across all your journeys

Default values in the form builder
Shared by Georg
• May 26, 2026
You can now set default values in input fields when building forms. This makes it easier to pre-fill common answers and reduce friction in your customer interactions.

Great use cases
- Auto-fill the new-hire form from the signed offer — HR reviews and confirms instead of retyping every field from the contract.
- Pre-fill promotion requests with the employee's current role and salary — managers only edit what's actually changing, so the diff is obvious to HR.
- Carry last quarter's review goals into this quarter's form — managers refine instead of starting from a blank page.
Important to know!
- You can field map values received from other actions in the journey. 🧠
- You can only use this in the form builder in the "Send form" action - not external form triggers.
- Input fields in forms can have a mapped default value
- Pre-fill common responses to streamline your customer conversations
- Works with dynamic data mapping for flexible default value setup
Let us know if you have questions or feedback on this feature.

Add Supporting Text to Form Fields
Shared by Georg
• May 26, 2026
You can now add optional supporting text to form fields, giving you a way to provide context, instructions, or examples to your users. This explanatory text appears directly below the field label and above the input.

- Supporting text is available for all input fields (Short text, Long text, Number, Date, File upload, Phone number, Email address) & selection fields (Multiple choice, Single choice, Dropdown)
- A new "Supporting text" input appears in the form builder's field configuration, positioned between Label and Placeholder text
- Supporting text is saved with your form and renders in both external forms and the Send form journey action
- Leave supporting text empty to show nothing—spacing and layout remain unchanged
We'd love to hear how you use this feature to improve your forms.

Filter any column in two clicks
Shared by Georg
• May 26, 2026
Filtering a table just got a lot faster.

Every column header menu now has a Filter by this field option. Click it and a filter popover opens right at the column you're on, pre-targeted at that field. Two clicks from "I want to filter this column" to a set value, no trip up to the toolbar Filter button.
Why you'll like it
- Two clicks instead of four. Open the column menu → Filter by this field → set your value. Done.
- Pre-targeted. The popover already knows which field you're filtering, so you can't pick the wrong one by mistake.
- Works everywhere. Every table column header in the product gets the shortcut — same behavior, same place.
- Stacks with existing filters. The new filter is added to whatever you already have set; nothing is reset.
Open any table, click the ⋯ on a column header, and look for Filter by this field.

New trigger, meet Mailhook!
Shared by Georg
• May 26, 2026
You can now kick off a journey workflow just by sending an email to a specific e-mail address.

Add a Mailhook trigger to any journey and you get a unique trigger email address. Forward (or have a system send) an email to it, and Mailhook uses AI to pull the details you care about out of the email body, full name, email, plus any traveller or journey fields you define and starts the journey for that traveller automatically.

What you can do
- Trigger by email. Each Mailhook has its own dedicated address — copy it once and you're done.
- AI extracts the fields. Full Name and Email are picked up out of the box. Add more traveller or journey fields and write a short instruction telling the AI what to look for.
- Test & Configure. Paste a sample email and Mailhook generates the extraction instructions for you — no prompt engineering required.
- Conditions, duplicates, auto-start. Same options you're used to on other triggers.
Open any journey, add a trigger, pick Mailhook, and try it on a sample email, the Test / Configure button does most of the work.

See exactly what happened on every action, Activity timeline
Shared by Georg
• May 26, 2026
Ever wondered when an action ran, who edited it, or why it was skipped? You don't have to anymore.

Every action in a traveler's journey now has an Activity tab that shows a chronological timeline of everything that's happened — automatic events from the system and manual changes from your team — with who did it and when.
What gets logged
- Action started / completed — when the system runs an action
- Manually started — someone kicked it off by hand
- Skipped / unskipped — and who did it
- Condition bypassed — a condition was overridden
- Action edited — configuration changed mid-flight
- Action reset — back to the drawing board
- Action error — what failed
- Reminder sent (Send form actions)
Open any action in a traveller's journey, switch to the Activity tab, and you've got the full story at a glance, no more digging through logs or guessing who clicked what.

Feature
SSO User Identity Now Pre-fills Portal Forms
Shared by Georg
• May 26, 2026
When your users sign in via Azure SSO to access portal forms, their name and email can now be automatically pre-filled into submitter fields. This reduces friction, improves data accuracy, and makes form submission faster.

- Enable "Use signed-in user identity in forms" in the portal Security tab (Azure settings) to set a portal-wide default for how pre-filled fields behave
- Choose whether pre-filled fields are locked (read-only), editable, or not used at all—and customize per form if needed
- Individual forms can override the portal default with their own "Portal identity for submitter fields" setting
- This feature only applies when the portal is secured with Azure SSO login
Let us know how this works for your team, or reach out if you have questions about configuring the feature.

Improvement
New Export Options for Traveller Data
Shared by Georg
• May 26, 2026
We've expanded the ways you can export and work with your Traveller Data.

You now have two additional export options alongside the existing CSV format, giving you more flexibility to analyze and share your data.
- Export as XLS file — downloads your data in Excel format with the same structure and applied filters as your CSV export
- Open in Google Sheets — creates a new Google Sheet with your Traveller Data and opens it automatically in a new tab, ready to collaborate
Both options respect your current filters and maintain the same column structure as before. Let us know how these new export options work for you.

Journeys
Feature
User Roles
Shared by Georg
• March 10, 2026
You can now control who can submit external forms and when they close. Journeys uses company-level roles to control who can access settings, navigation areas, and administrative actions across your company account.
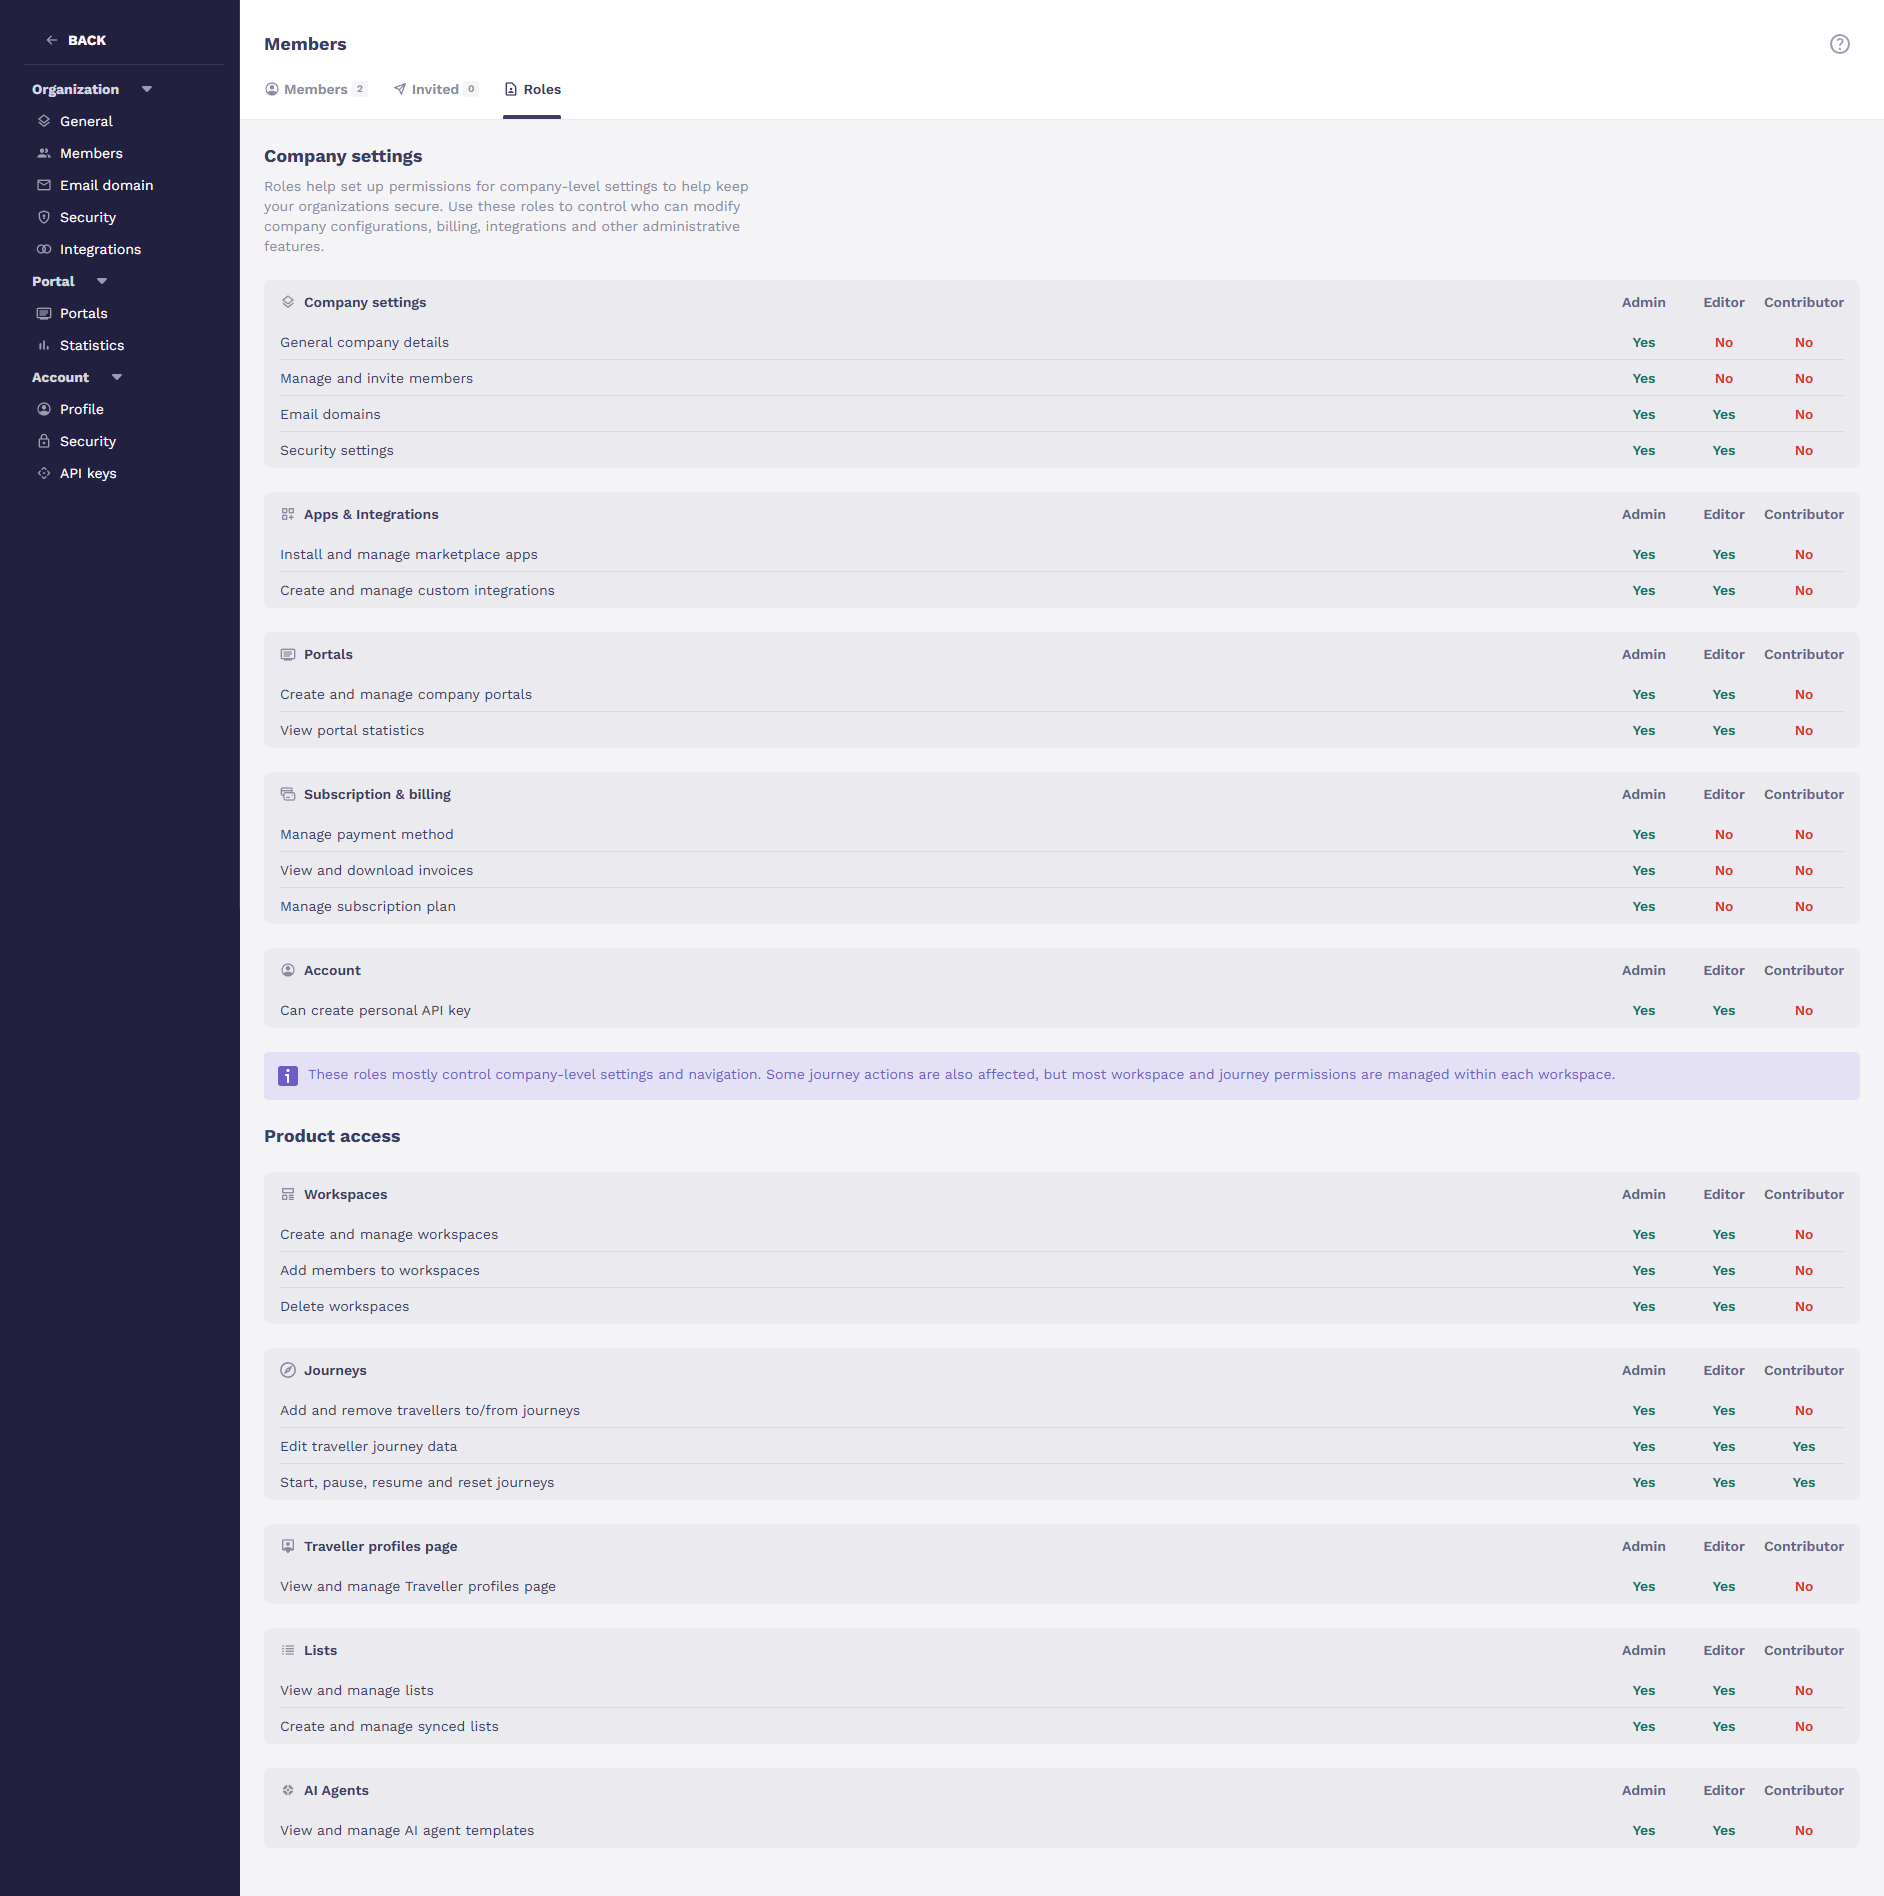
These roles ensure that users only see and interact with the parts of the platform they have permission to use.
There are three roles:
Admin -> Full access to everything, including billing, security settings, and member management
Editor -> Can build and manage journeys and workspaces, but can't touch sensitive company-level settings like billing or security
Contributor -> A focused role for people who need to work within journeys but don't need access to configuration or admin features
Roles are assigned when inviting a new member or by editing an existing one from the Members page.
Navigation automatically adjusts based on the role, contributors and editors simply won't see sections they don't have access to.
There's also a safety guard built in: you can't demote the last Admin in your organization.